Showing posts with label Paper Piecing. Show all posts

Wednesday, May 21, 2014

Poltergeist Rabbit - 4 years in the making

They say every quilt has a story and this quilt definitely has a story.  This story resulted in this quilt's name. Wait, do they say that and who's "they"?  Regardless, let me share a tale with you and since this took 4, almost 5 years, to complete, go grab a cuppa something, sit down and get comfortable.

It all started with my sister who wanted to hire me to make a quilt for my SIL.  I told them it was good practice (I'd only been quilting a couple years) so covering cost of fabric would be all that I'd ask for.

V (SIL) chose the Jinny Beyer Shimmering Sea pattern and asked for it to fit a king quilt. I thought, no problem, I love foundation piecing! I did not pay attention to my inexperience or the level of skill they cautioned as needed.

I took V to the store, she chose most of the fabrics and then I go started cutting. I cut, a lot. To put it in perspective, there are 45 pieces in each block and I decided to make a 6x6 quilt.  That's 36 blocks which means 1,620 pieces, borders not included in this quilt.  Add borders, binding and backing and I have 1,640 pieces of fabric in this quilt (I'm counting the back and binding as one each).
That's the most I've ever done for one quilt!


Anyway, I cut and then I copied and traced 36 foundation patterns but not before dealing with the first mishap.  A pup who, it seems, did not appreciate Ms. Beyer's pattern in the same way I did. 
I bought more tape that night.

Eventually I started sewing and on the third block, realized I had a problem. I sewed it backwards (the design was rotating in the wrong direction). Once I realized how this happened, I figured I could avoid it but no, I managed to do it 3 more times.  4 blocks I now have as scrap blocks. 
I kept  sewing. Each block took me between 1 hr and 15 minutes to 1 hr and 30 min. to complete. I wondered what was wrong with me. Then I would put it away for a while, months at a time. We moved houses, I lost the fabric pieces and blocks for a bit but I knew they would turn up sooner or later.


Eventually they did but then my sisters’ dog was ill and had a hard time controlling her bladder. I couldn’t justify rushing to finish a quilt that would have to sit in a closet.  I took my time with it but was feeling ambivalent.  So I put up blocks on a design wall and shared it with my sister. It did what I wanted it to do, set my sisters on my tail to find out when it was going to be complete. 
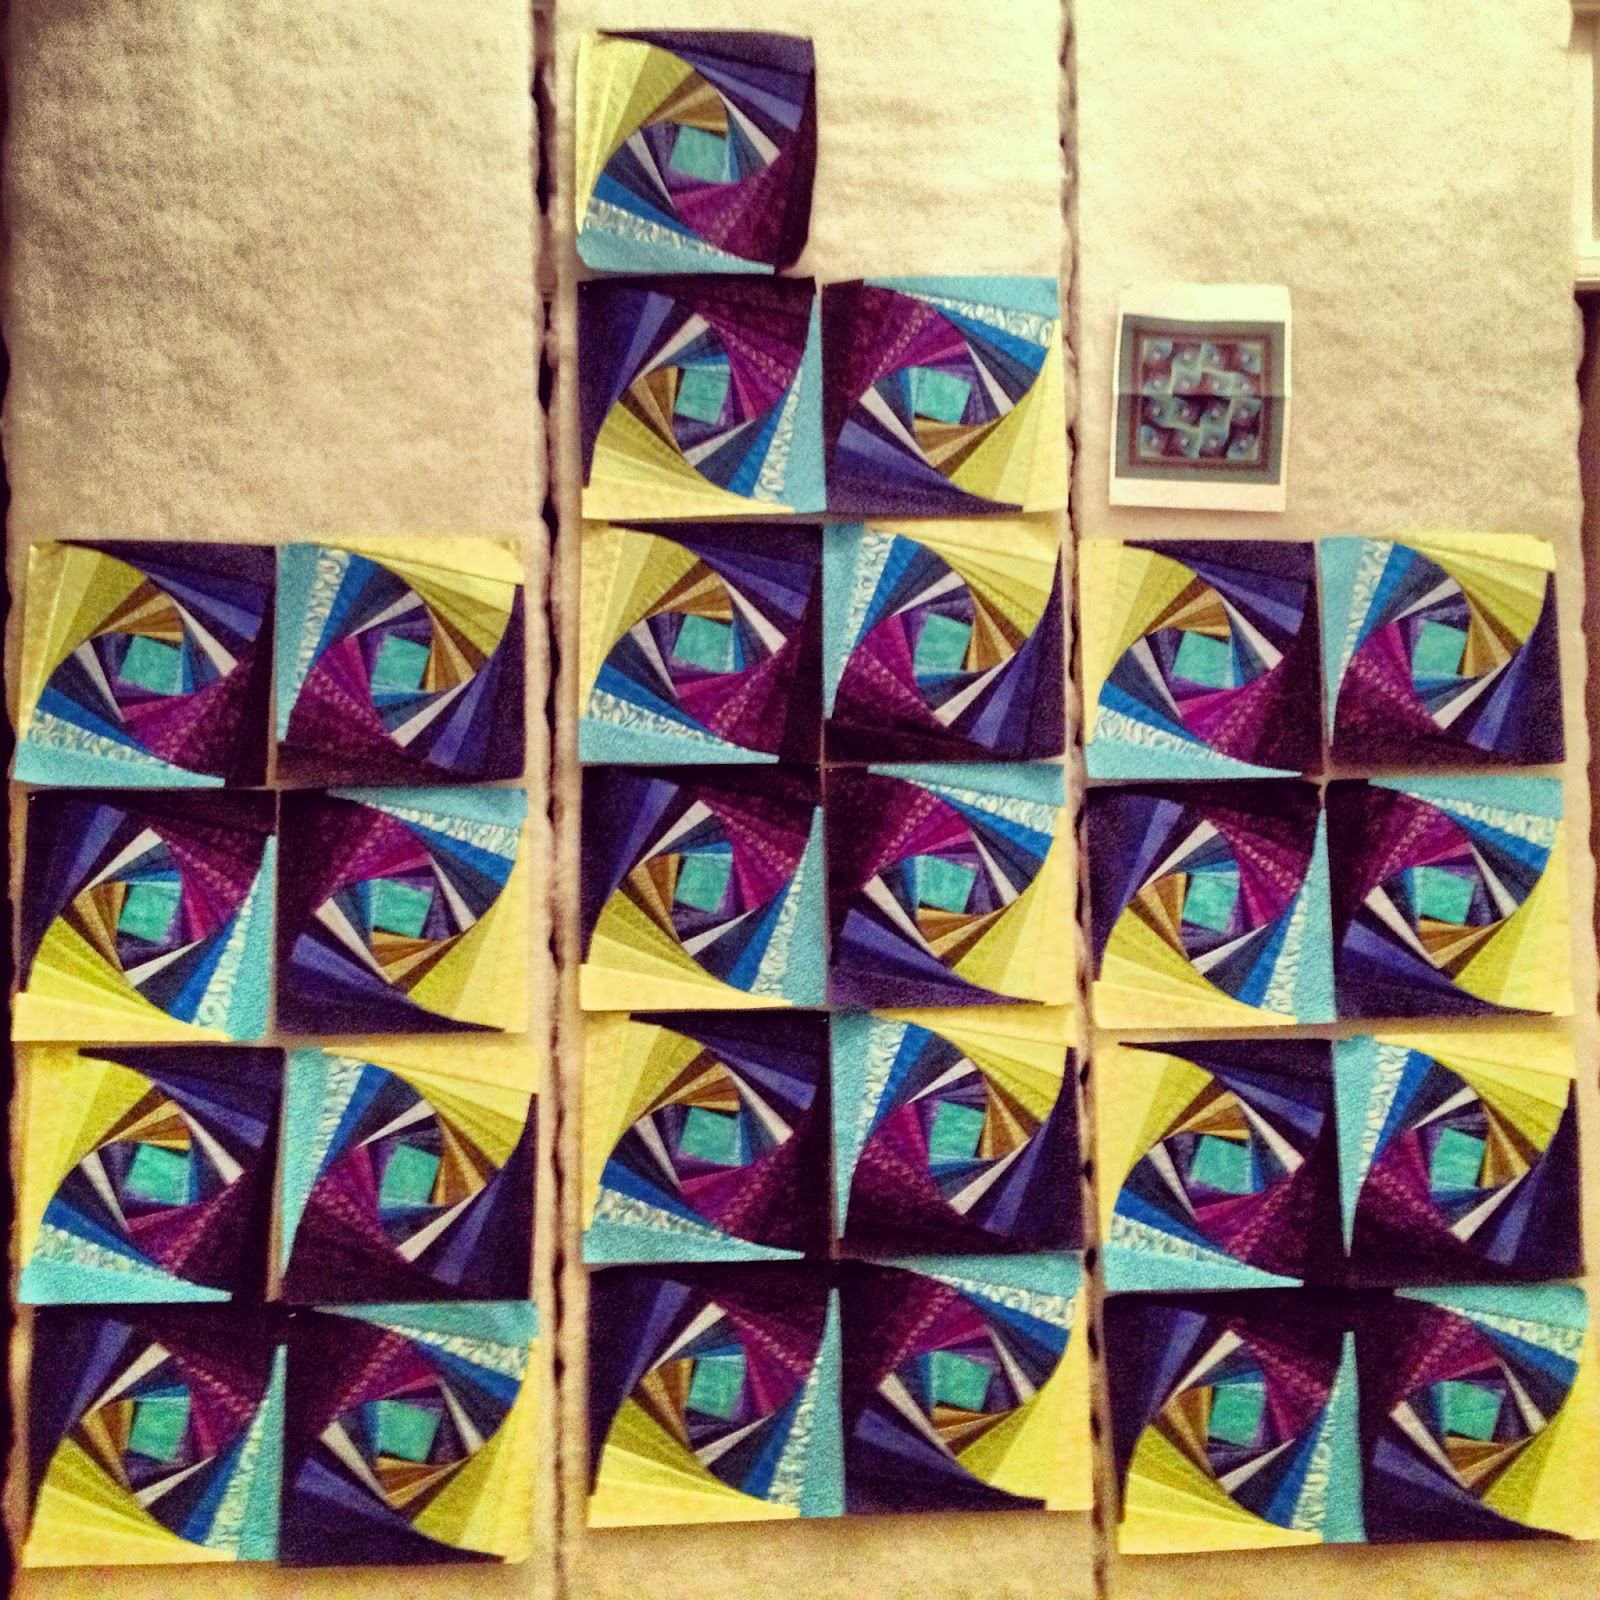
I had a plan. I was going to finish it and take it down to them when I visited at the end of February. I was making good time. I loaded the quilt on the frame and started quilting it.


Then, I started having machine problems. The knob to raise the presser foot broke, the tension screw was stripped and the lever to raise/lower the presser foot was out of alignment. 

That may not sound bad but I didn’t know those were the issues when they presented themselves. Thankfully, Nolting (Hinterberg) was VERY RESPONSIVE and super helpful with their responses. I couldn’t, however, finish the quilt in the time frame I wanted and I did have to talk with the tech/sales people at the same quilt show I was heading down my sister’s way for.  I threatened Ms. Midge (my machine) that it might be time for me to purchase a new one. 
I only had this much left to quilt when she decided to act up.
When I returned from the show, I was 80% decided I would hold off on purchasing a new machine. I set Ms. Midge up with new parts and started sewing but she STILL gave me problems. Clearly, she felt she should still be on strike but I had other plans.  I adjusted a few things and told her she better shape up or, my 80% would change from keeping her to trading her in.  She started purring sweetly and sewing straight.  AMAZING how management can threaten labor with being fired to get them to perform again. –wink-
I was able to finish it up and add the binding. Then I realized there was no way I could take pictures which would do it justice. This thing was big and beautiful. Now what?  Ah yes! I’m giving it to a photographer after all.

I sent it to her and then on Easter weekend, we went to the docks and took some photos.  Of course the day had to be windy and we were hanging on to it for our lives. We had visions of it slipping away and landing in the water. Talk about the most nerve wracking photo shoot ever! But it was worth it. Look at what she came up with. It makes this quilt look great and I’m a bit amazed I made it.  Despite the long term process and despite the hiccups I have come to love this quilt after seeing these pictures but I’m am glad I don’t own it.


That reminds me, of its name.  Poltergeist is the descriptor because, frankly, all the little things that happened during its making and all the time it took to complete it. Rabbit because it’s a substitute for the swear word I uttered often completing this quilt. The “f” word substitute came from my SIL when the kids were young and listening to what we said.


So here you have it, the Poltergeist Rabbit shown in pictures that are fantastic from Ren Photography in Hampton Roads, VA area. 

Cheers!
Beck

Friday, October 25, 2013

Blogger's Quilt Festival - Fractured Sunlight

I have been waiting for the Blogger's Quilt Festival, hosted by Amy's Creative Side, to unveil this quilt on my blog.  First, though, if you are here from the festival, welcome! If you have not heard of it, click the link to check it out. It is an awesome, online quilt show that will open up for voting at the end of the week. I absolutely love this festival.  I try to visit each and every blog to see the creations and I become so inspired.

On to my entry, which I'm putting into the Two Color Quilt category, I love this quilt for a few different reasons.
-         It makes a bold statement in its simplicity (honestly, it looks much more complicate than it is.)
-         The design is 100% my own, but I did enjoy using the InstaGram community for opinions along the way.  (I love IG these days, feel free to find me at Sarcastic Quilter.)
-         The kids and hubs (who doesn’t usually like modern quilts) all love it and enjoy seeing it on the wall.
-         The kids participated in the photo shoot of the quilt! You have to read on for details on this one. I’ll just say now it was one of my finer parenting moments and I am bragging because it’s so hard to have these moments when they are all teens! LOL

This quilt uses the "Sunrise" block from EQ6 and is foundation pieced. I did a QAL a couple years ago with this block to teach foundation piecing but have been wanting to explore different looks I might get with only two colors. I chose the fabrics.
I made four blocks and tested designs.
I sewed the remainder of the blocks, then pieced borders and sewed them on. Next, I quilted the heck out of this baby, echoing the shapes in each block and border and even mimicking some of the print on the fabrics in places.  

Regarding that parenting moment, it was shortly before school started. The kids nor I had any activities all weekend and the sun was shining.  I told them to get their shoes on, grabbed this and another quilt which needed photographing and we hopped in the car.  When the kids asked what we were doing, I said going on a photo shoot. They all had to come up with places to photograph the quilts at, keeping in mind the style of the quilts and figuring out complimentary backgrounds etc. Reluctant at first, after the 1st location (a park down the road), they were in the spirit.  Taking my camera and taking photographs themselves or giving me instructions on angles as they were hanging and arranging the quilts.
For example, the shot below actually has my kid pulling on a branch to open up the draped quilt. He passed the little seedling and thought it would be great to drape the quilt on with the background and filtered sun. Kind of cool for a 13 year old, don't you think? I'm convinced these kids have more than we do half the time & we just need to find ways to let them express it.
My kids got creative, we spent a few hours outdoors together and we had fun laughing and sharing. Many of these photos came about because of the quilt's name, "Fractured Sunlight", can you tell?  
There were quite a few people around so it became a big race to get photographs without folks moseying along the paths in the background.
So, I love this quilt. Not just for the personal experiment it was for me in designing, creating and quilting it but for the wonderful excuse it provided for an afternoon of fun and comraderie with my kids.

If you like it, please consider nominating it and giving it a vote.  That would just be some nice icing on the cake to share with the kids.  I know their involvement in the story will make them proud.
I am off to view all the other beautiful entries now, I hope you enjoy the rest of the festival and a big thanks to Amy for hosting and ALL the sponsors this year!!!

Cheers!
Beck

Monday, March 28, 2011

Paper Piece QAL - Week 2

ETA:
ACK! I just realized in the post below I talk about this being a 9x9" square and it's not! It finishes at 9.5"x9.5".  Please translate that when you read 9" below.  My apologies. To those that have already printed and enlarged their patterns, it's OKAY to finish this out using 9x9 inch squares. It just means more leftover fabric instead of not enough.  I'm sorry for the inconvience.

I'm sorry this post is a couple days late. With it being quarter end at work and March Madness here, I lost 2 days of the week to other stuff.

This week: Pattern preparation and cutting.  Say it with me, "yea!"

Preparing the Pattern:
1) Pring this pattern.  Use THIS LINK, not the picture below (and disregard the "A" in front of the letters, it means nothing).  I've set it up so if you print both pages at your normal printer settings (for normal 8.5"x11" paper), it should come out to look like each sheet pictured in the link.  You may have to "download" it first but it should still print as 2 pages. 
For my friends using A4 paper (thanks for asking Shevy!) I am not sure how to advise you the best way to print. There is another link below, a JPEG of the entire block but it prints (for me) as a 6"x6" square instead of 9"x9".  Here's the JPEG link.
UPDATE: Ms Pyjamas of Australia states she printed this and it came out at 6.75".  She then enlarged it by 31% and it came out to be 9" blocks.   Just get it as close to 9" as possible without going over too much and make all your blocks the same size and this will still work out with fabric requirements.

Once you print, fold one side on the line and tape the folded part to the matching line on the other sheet.  THEN MEASURE IT, please.  Each block should print up at 9"x9" with both sheets.


2) Put the block under one piece of tracing paper and using a ruler, trace all lines onto tracing paper (including the block outline). Add the numbers to the sections on your tracing paper.
3)  Now, you can repeat step 2 for all other pieces of tracing paper (if I have a 4-block quilt, I'll do that but if I have a 35 block quilt, I follow the following approach) or you can line up about 6 - 8 pieces of tracing paper ("TP" now b/c I'm tired of typing it) and pin them together securely.  Then, with the thread OUT of the sewing machine, use the needle to punch lines through all layers of the paper to create perforated line patterns on the other TP pieces.  If you have a machine that yells at you when you are trying to work without thread (like mine) the other alternative is to use the tool below and do the same thing, puncture each TP piece. However, you can only do 3 or 4 at a time with this method. 

If your eyesight is poor, I recommend following direction # 2 above. 
The last alternative, print the # of blocks you need from the printer. I only use this occasionally b/c (a) it's thicker paper and makes tearing away more difficult and (b) it uses a lot of  paper and ink.
4) Once all sections are marked with perforated lines or actual, drawn lines, be sure to number them all.  Pay attention and be sure you don't accidently turn blocks upside down before numbering.   Set aside. 

Cutting the fabric:
NOTE 1: Since there are so many options, I'm not breaking cutting down by each quilt. I'm giving you the cutting requirements for each block. You determine how many pieces you need by the # of sections in each block x the number of blocks with that color scheme. In one version, I have 3 yellow blocks.  3 yellow blocks times 2 sections of the medium, dark yellow = 6 med., dark yellow pieces total.

NOTE 2:  Reminder, once we are done, there will be waste from the fabric cuts. This can be reduced with PP practice but because we have newbies, I want to be sure struggling with angling fabric is NOT part of this QAL. Plan to pass your scraps to a friend who likes applique if you don't applique yourself.  That's the best advise I can offer.

A) Cut fabric for sections as listed below.
Section 3 = 5 1/2" x 10"
Section 8 = 5 1/2" x 10"
Sections 1 & 5 = 4 1/4 x 8 1/4"
Sections 2 & 4 = 4 1/4 x 8 1/4"
Sections 6 & 7 = 4 1/4 x 8 1/4"

Examples of cut sections for my yellow blocks.


B) You can cut borders now if you don't already have them cut and (please refer to week 1 post for the measurements you need) but I always wait until the end to cut those. I tend to measure better.

That's it for this week, folks. Next week, we will begin piecing. I will post every Monday from here on out! Let me know if you have any questions and please remember to post progress on our Flickr group. :-)


Cheers!
Beck

Wednesday, March 16, 2011

Q&A on Quilt along (and a widget!)

I'll post answers to questions for the supply list here over the next couple of days.

1) No need for lots of printing, you can do that but if you do, you need printer ink and paper, not tracing paper.  All you will need is 1 print copy of the pattern. Perhaps a friend will let you use their printer if you don't have one?

2) FQ's will work for this but you have to do your own math.  I tried to do it but found I was confusing myself and that meant the chances of confusing you would be great. To determine if you have enough FQ fabric, you can use the individual cut section sizes first listed. I am not providing cutting instructions, it doesn't matter which way you cut, it only matters that you get pieces for each section in the sizes I've indicated (and more on that next week.)

Now, if you want to let others know you are participating (or if you just want to help spread the word), I think I've acutally created a functioning button that you can add to your own blog.  See my side bar for the code. :)  It is linked to my blog as opposed to a specific post, but that's the best I can do for now.

:-)

Tuesday, March 15, 2011

Quilt along post #1, suppply list.

I am late in the day posting, I know and apologize but to make up for it, I'm giving you a few options, and a week and a half to pull your supplies together. Next quilt along ("QA") post will be the 24th of March.

First order of business. I do not know how to do the linkee thing so instead, I've created a Flickr Group for us.  Questions/discussions can be posted there, anyone with an email address can participate for free and no blog posts are necessary if you don't want to. Just post pictures as the weeks move along.  It's fun to see everyone's choices and progress in the same place. So, pop on over there and join up. 

PAPER PIECE QUILT ALONG FLICKR GROUP

Second order of business.  For all those participating (and posting their completed tops, not quilted quilt, just tops) at the end of this QA on Flickr, there will be a random drawing for a prize. Right now I have one prize (to be disclosed later but let's just say it's stash friendly) and if we have a big turnout, I'll add a runner up prize.

Finally, a supply list:
Rotary cutter, ruler and cutting mat
Tracing paper (enough for the # of blocks you choose & figuring blocks will finish at 9.5" square)
Fabric as indicated below.

If you want to go scrappy: the measurements for each piece of fabric for the block are:
Sections 1, 2, 4, 5, 6, & 7 = 4 ¼”x8 ¼”
Sections 3 & 8 = 5 ½”x10”

Yardage for 24”x24” Easter table topper:
Section 3 = 1/8 yd each, pale purple & light purple
Sections 2 & 4 = ¼ yd aqua polka dot
Sections 1 & 5 = ¼ yd light green flower
Sections 6 & 7 = ¼ yd yellow polka dot
Section 8 = ¼ yd pink polka dot
Border 1 = 2 EACH, 1 ½”x19”, 1 ½”x21” strips
Border 2 = 2 EACH, 2 ½”x22” aqua, 2 ½”x25” green strips
             An optional topper choice: 4th of July?

Yardage for 44”x53” garden quilt: (This is the quilt I am doing)
Section 3 = EACH, ¼ yard pale yellow, ½ yd pale blue, ¾ yd pale green
Sections 2 & 4 = EACH, ¼ yd light yellow, ½ yd light blue, ¾ yd light green
Sections 1 & 5 = EACH, ¼ yd medium yellow, ½ yd medium blue, ¾ yd medium green
Sections 6 & 7 = EACH, ¼ yd medium-dark yellow, ½ yd medium-dark blue, ¾ yd dark green
Section 8 = EACH, ¾ yd dark yellow, ¾ yd dark blue
Green Border 1 = 2 each, ½”x46” & ½”x39”
Dk blue Border 2 = 2 each, 3 ½”x48” & 3 ½”x45”
                                    An additional color and layout options for this same size quilt.
  
Yardage for 44”x53” pink ribbon quilt:
Section 3 = 1 ½ yd pale pink
Sections 2 & 4 = 1 ½ yd medium pink
Sections 1 & 5 =1 ½ yd light pink
Sections 6 & 7 = 1 ½ yd dark pink
Section 8 = 1 ½ yd medium dark pink
Light Border = 2 each,  1½”x46” & 1½”x39”
medium Border 2 = 2 each, 3 ½”x48” & 3 ½”x45”
                       Other color/layout options:


Yardage for 51”x51” patriotic quilt:
Section 3 = 1 ½ yd ice pale blue
Sections 2 & 4 = EACH, ¾ yd light blue, ¾ yd red
Sections 1 & 5 = EACH, ¾ yd medium blue, ¾ yd medium dark red
Sections 6 & 7 = EACH, ¾ yd medium dark blue, ¾ yd dark red
Section 8 = 1 ½ yd dark blue
Red border = 2 EACH,  1 ½”x46”, 1 ½”x48”
Blue border = 2 EACH, 2 ½”x48”, 2 ½”x53”
                Layout and color options:


I would like to take a moment to say, you are welcome to create your own design. You are also welcome to use solids, tone-on-tone or print fabric. This is all about being enjoyable to YOU and you alone.

Finally, I would like to say the fabric requirements are generous. There will be leftover after we cut and piece. I do not want people fussing with angling pieces and getting frustrated. Just look at it as a way to save scraps for your (or a friend's) applique stash!
Come post your fabric photos at the Flickr group.  Can't wait to see what everyone decides on. :-)  My fabrics are posted here and here.  I hope you have fun with this and if you are new to paper-piecing, this is an easy start. If you are familiar with it, I hope you find the variety of layouts and colors inspiring to you.

Cheers!
Becky